To get the point where two lines intersect, we will do some maths. To the mathematicians who will come across this post, I’m truly sorry for the heart attacks or strokes you may experience by reading this post.
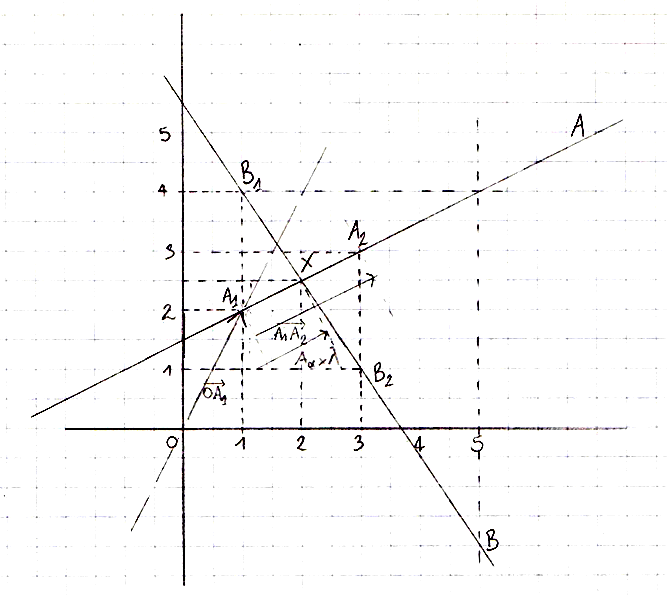
Ok, let’s take a look on the figure:
Figure 1
First, sorry, I was too lazy to make a proper figure using computer tools so I just put a scan. XD
Next, here are the definitions:
& : the two lines,
, : the arbitrary starting points of the two lines,
, : the arbitrary points which tells the direction of the two lines,
: the intersection point,
: the origin point.
Kewl. Now, what we want is the intersection point between those two lines. In other words, we want to know the position which starts from either lines’ arbitrary starting point, added by the direction of the line multiplied by a scalar value. So in our figure 1, the position is:
the position added by the components of multiplied by an unknown which I named
the position added by the components of multiplied by an unknown which I named
In this case, it is clear that so it will be easy to check if our final formula is correct. 🙂
At the point of intersection, we know that:
… which gives us:
But we can’t use this statement exactly like this to solve our equation as we cannot multiply and divide vectors in this raw format. Also we need to reduce the unkowns count to 1. So we will separate our equation into two equations with the magic of matrices (which I don’t understand well at the moment), one for the x component and one for the y:
To make our equation more readable, we will use some shorthands:
… so:
From this point, we can reduce the unknown count. In my case, I have chosen to keep instead of :
And finally, you have to check if . This will happen if your two lines are parallel or if there is one line defined as a point such as or ; no solution exists in those cases.
Il peut vous arriver d’importer des images vectorielles sous format EPS dans un de vos projets Adobe Premiere Pro (je suis sur CS5). Mais voilà, vous vous retrouvez avec une image floue dans le rendu.
Une solution serait de convertir votre EPS en un fichier PNG de haute résolution. Mais la qualité ne serait pas consistante selon la résolution de l’export final. Et dans mon cas, je ne pouvais pas ouvrir l’EPS dans Illustrator CS5 car le fichier aurait été enregistré avec une version plus récente d’Illustrator.
La meilleure chose à faire est en fait de passer par After Effects pour obtenir une rastérisation correcte, quelle que soit la résolution de l’export final.
Si vous avez déjà posé l’image dans votre timeline de Premiere Pro, il vous suffit de faire un clic droit sur le clip puis « Replace With After Effects Composition » qui a pour effet de :
remplacer le clip par un projet After Effects dans Premiere Pro,
ouvrir automatiquement After Effects avec votre EPS dedans.
Dans le projet After Effects ouvert, il faut cocher la case « Continuously Rasterize » qui se trouve à côté du nom de votre fichier EPS dans la timeline, comme montré dans la capture d’écran (une sorte de soleil).
Emplacement de la case Continuously Rasterize
Sauvegardez le projet After Effects, puis revenez sur votre projet Premiere Pro. Faites un test de rendu, vous verrez que l’image est désormais nette !