When you install a new Linux alongside another one, your computer will likely use the last installed OS’s GRUB instead of the one from the previous install.
In my case, I have installed Debian, and a few days later, a Linux Mint on the same disk. But the thing is I prefer the Debian’s GRUB because it is prettier, with a nice image background! Also, I want to keep Debian as my default choice on boot. I could have modified the boot order via Grub Customizer (I will let you Google that) but still! The Debian’s GRUB is better than the Ubuntu’s (Linux Mint’s) dark and ugly one. 😛
Step by step
To use the old install’s GRUB, use those commands from the old OS (Debian for me):
1
sudo grub-install /dev/sdX
… with the X corresponding to your disk of installation. For example: sudo grub-install /dev/sda
The japanese IME on Debian, when installed properly, works pretty much similarly to the Windows 7 one… I was quite surprised by the quality of this software piece.
Step by step
Install those packages from official repositories: ibus and ibus-mozc (along with their dependencies, of course).
Launch the Region & Language settings app.
In Input Sources, click on the + sign.
Search for the Japanese (Mozc) input source and add it.
You are ready to use the IME. 🙂 Quickly switch between input sources with Super (Windows key) + Space.
Okay, it’s possible it will not work on your side. I have done some other steps but I am not sure if they were useful or not (I started from a near fresh install). If the steps above didn’t work, you may have to open the Input Method app. Then click on Yes, Yes. Select ibus and click OK. Then OK again. Then restart your computer. From there, you should be able to add the Japanese (Mozc) input source in the Region & Language settings app.
Some day, I will try to redo those steps in a virtual machine to make sure the steps are working… Until then, 幸運を祈ります!
Additional Notes
Use the keyboard layout selector widget in the GNOME’s top bar to change the input mode from Direct to Hiragana.
In the Region & Language app, click on the Options button and select Allow different sources for each window if you find this behavior more practical (it’s my case!).
I was doing an ingame video capture and I needed to have it in a GIF format. A few frames of the animation could be optimized as there were sometimes still images. So if I wanted to remove those unnecessary frames (while keeping the correct duration, of course), one can simply use ImageMagick.
How to
ImageMagick should be included by default in Debian and probably other distributions. So you just have to use the convert command. Here is an example:
It will remove duplicate frames and try to optimize frames by looking at similar areas of the pictures across the animation so they don’t appear twice.
Now, if you have specific needs, you better check the documentation here: http://www.imagemagick.org/Usage/anim_opt. There are some examples which will give you an idea of how to perform the best optimization.
Make sure to use the right properties for the right vCard version. I am using 2.1 in my example.
Things to consider to prevent reading failures
Make sure the color contrast between the dots and the background is sufficient.
Dots should remain dark and the background should remain clear.
Make sure the dots are large enough if you want devices with fixed focus (such as my Moto E 1st Gen) to read the image. For instance, the example image was generated with a 4px dot size; 3px dot size was not readable by my Moto E on a 22″ 1920×1080 screen.
If you resize your image in a graphics software, it is best to use nearest neighbor interpolation algorithm to preserve sharp dots.
If your dot size is 1px, don’t shrink your image as it will lose information. (pretty obvious)
Make sure the QR code users will physically have access to the space right in front of the image / print. So don’t put a barrier in front of the image…
Output written on texfile.dvi (1 page, 584 bytes).
Transcript written on texfile.log.
Convert to a SVG image with a 1.5 scale factor:
1
$ dvisvgm texfile.dvi -TS1.5 –no-fonts
Your file is ready as texfile.svg.
Remarks
There is no padding in the SVG method. I have not found yet a method to add a little padding around the figure.
Also, the --no-fonts is necessary to prevent rendering issues about SVG fonts, especially with Firefox and the default SVG viewer of Debian. So the generated formula will not be selectable as a text, but at least, it will render correctly on every device with SVG support.
Background
I needed to include some nice looking formulas on my new game design wiki. I am using MediaWiki but the math add-on was not working on my server (web hosting service, not mine). So I decided to create myself the images offline and upload them as regular image files, so that I don’t need to think too much about trying to set the add-on without having all the privileges I could have on a personal server.
I have to update my post because the previous fix does not work anymore with recent versions of debian + GNOME 3, on the same laptop as before (sandybridge core i3).
Now, you have to follow this suggestion given by people all around the world: edit the /etc/default/grub file in super user mode and insert acpi_backlight=none to the GRUB_CMDLINE_LINUX_DEFAULT variable. For example, here is what I have:
After editing this file, run sudo update-grub and reboot. Backlight keys should work now.
You can get rid of the 20-intel.conf file if you have used it.
Tired
Time spent to get the info: one day. Length of the fix: a few lines. Haha, this is so ridiculous it makes me smile a little.
Okay, so you are:
on fresh Debian Jessie (GNOME 3),
on a laptop,
with an integrated graphics unit,
and it is an Intel CPU. In my case, I have a Core i3 Sandy Bridge CPU with HD Graphics 3000.
The backlight function keys:
are working so you have an on-screen display feedback,
are not changing the effective brightness of your screen,
are changing the values of this file: /sys/class/backlight/acpi_video0/brightness (close and reopen in gedit to see the value changing or check by command line).
You have this folder: /sys/class/backlight/intel_backlight.
If this fix does not work on your laptop, I am sorry to hear that but I cannot help you further. Don’t ask the noob. I have just followed guidance on linux threads such as here: link to Ubuntu’s launchpad website. Good luck!
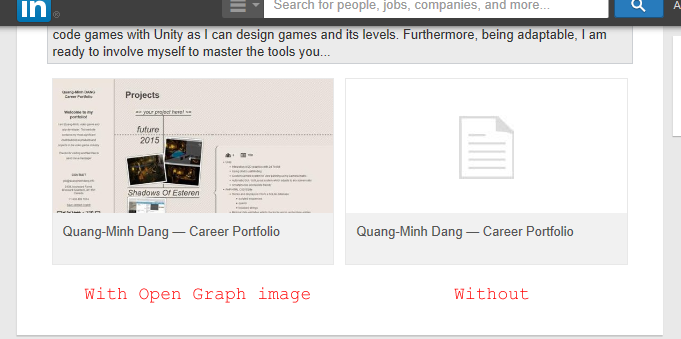
Comparison between with open graph image and without
Upset.
I have just spent four hours to figure out how to put an image preview for URLs linking to custom web pages which you put on LinkedIn profile pages. You know, those links added as media.
First, you have to add Open Graph meta tags to your website. Just put those meta tags as shown below in the <head> html tag:
XHTML
1
2
3
4
5
6
7
<meta property=« og:type »content=« website »/>
<meta property=« og:title »content=« Page title »/>
<meta property=« og:description »content=« This description will be used by LinkedIn crawler. »/>
Don’t forget to modify content attributes value! I think LinkedIn only needs a few meta tags from what is in the example code but testing how LinkedIn crawls my website is just a pain in the ass.
VERY IMPORTANT: It seems the LinkedIn crawler needs the webpage to have at least one <article> tag to work with. Or else, the crawler will crash and you will get this error message:
1
Sorry, there was a problem processing your request. Please try again.
Before adding your link to LinkedIn, check if open graph tags are properly set by following this link and log in: Open Graph Debugger. Facebook should find the Open Graph tags when you put your URL and click « Fetch new scrape information ». If not, check your code.
Then, you can put your link on LinkedIn.
If you want to make changes to your image, you will have to deal with the LinkedIn caching system. This system keeps the Open Graph data and associates it with the URL you provided on LinkedIn. So you will have to workaround this system by adding extra unused query string to use a new URL. For example, if the pointed page can be accessed at http://example.com, you can use those alternatives:
1
2
3
4
http://example.com/index.html
http://example.com/index.html?a=1
http://example.com/index.html?a=2
http://example.com/index.html?linkedin=wtf etc…
Pretty complex, isn’t it? Okay, it’s time to close my 40 browser tabs and get some sleep now. ^^’
Vous avez vu ce super titre en anglais ? Héhé, je me prépare pour le Canada, c’est dans très bientôt !
Je suis tombé sur un bug d’Illustrator CS5 qui me prévient de la rastérisation des dégradés lors de l’export d’un objet, qui contient évidemment un dégradé, dans le format SVG Tiny 1.1+.
Explications
Ce bug intervient lorsqu’un objet avec un dégradé a été tourné avec l’outil de transformation. Pour corriger ce problème, il suffit de repasser tous les objets que vous avez tournés en mode couleur unie puis en dégradé. Et normalement, l’exporteur ne rasterise plus les dégradés !
Here comes the english version!
An english title calls for an english content, eh? 🙂
I have had a bug with the SVG Tiny 1.1+ exporter which says the gradients will be rasterized on export. Tiny 1.1+ is supposed to support gradients, so why does it have happen?
This is a bug which occurs when you rotate with the transformation tool an object which has a gradient fill. To circumvent this bug, you just have to switch the color fill to plain color and return to gradient fill on all your objects you have rotated. And normally, the exporter will not (hopefully) rasterize your gradients anymore!
Ok, je viens de passer quelques heures à me demander pourquoi le positional tracker n’était pas détecté correctement sur mon PC (Windows 7 64). Les symptômes :
le tracker fonctionne correctement quand on le branche en USB sur le casque directement via le port qui se trouve sur le dessus,
le tracker ne fonctionne plus quand on le branche sur le PC sur un des ports de la carte mère : il est marqué en tant que « Unknown device » dans le gestionnaire de périphériques.
La solution au problème : changer de câble USB. Oui, le câble par défaut a un défaut. Il n’est pas capable d’alimenter en énergie le tracker si on le branche sur un port de carte mère. Je ne sais pas pourquoi il fonctionne quand il est branché sur l’oculus. Cependant, il ne faut pas prendre n’importe quel câble USB en tant que remplacement car celui-ci doit être plus robuste que le câble original. J’ai testé avec deux câbles différents, l’un étant plus fin que l’autre. Le câble fin, qui je pense a été fait pour du USB 1, n’a pas pu délivrer la puissance nécessaire au tracker. Par contre, l’autre bien plus épais et probablement fait pour du USB 2 ou un disque dur externe, est celui qui a permis de brancher le tracker sur le PC directement. C’est pourquoi si vous devez chercher un câble de remplacement sur internet, je vous souhaite bonne chance pour trouver le bon. XD
Plantage de l’éditeur Unity sur la re-sérialisation en texte
Lorsque vous avez un gros projet Unity entre vos mains et que vous décidez de forcer la sérialisation en texte (Project Settings > Editor > Asset Serialization > Mode: Force Text), il se peut que vous rencontriez un problème de mémoire insuffisante qui fait crasher Unity. Lors du processus de « re-serialisation », Unity charge tous vos assets dans la RAM pour recréer les structures de données du format binaire vers le format texte. Puis arrive le moment tant redouté : l’éditeur n’arrive plus à allouer de la mémoire et crashe !
Ceci est dû pour l’une des deux raisons suivantes :
l’incapacité d’Unity à allouer la mémoire nécessaire due à la limitation des applications 32-bit.
si vous êtes sur Unity 5, bien que l’éditeur soit 64-bit, il n’y a pas assez de mémoire sur votre PC.
Quel que soit le cas, pas de panique ! Vos données n’ont pas été corrompues par le crash vu que le travail se faisait uniquement en RAM. Néanmoins, il se peut que vos derniers changements apportés au projet se soient évanouis dans la nature (parfois, il faut fermer l’éditeur proprement pour s’assurer que des changements sont sauvegardés sur le disque).
Comment remédier à ce problème ?
Pour ma part, la recherche de solution et la résolution m’ont pris un peu plus d’une heure. J’ai passé pas mal de temps sur les forums sans trouver de réelle réponse précise qui n’implique pas le devoir de redéfinir des valeurs et des références qui ont disparu lors de la conversion. Mais de mon côté, j’ai pu trouver une méthode qui permet de faire la conversion sans perte de valeurs et de références !
Je suis trop fort !
Voici donc mon pas à pas :
Déjà, partez d’un projet stable, sans erreur. Corrigez vos bugs avant de convertir les assets en texte.
Archivez votre projet quelque part. Ben oui, c’est important d’archiver avant de faire de opérations dangereuses.
Dans l’éditeur, dans la fenêtre Project, sélectionnez tous vos assets puis exportez-les dans un unitypackage via Export Package…
L’export peut prendre plusieurs dizaines de secondes, voire minutes, selon la taille du projet (mon package faisait 750 Mo !)
Mettez votre package pas trop loin, on va s’en resservir souvent pendant le processus.
Supprimez tous vos assets dans Project ! Quand je vous disais d’archiver le projet, ce n’était pas pour rien…
Définissez Project Settings > Editor > Asset Serialization > Mode: Force Text
Double-cliquez sur votre unitypackage depuis l’explorateur et attendez le chargement qui peut prendre du temps.
Désélectionnez tout puis sélectionnez uniquement une partie du package pour l’import.
Le but est d’importer petit à petit les assets. À chaque import, Unity va re-sérialiser en texte.
Si l’import plante (et donc que Unity crash pour out of memory), c’est parce que vous avez pris trop de fichiers d’un coup. Dans ce cas, réimportez à nouveau en prenant moins d’assets.
Vous constaterez très probablement que la console vous signale des erreurs pour classe manquante. Dans ce cas, identifiez un asset ou un groupe d’asset qui contient la classe manquante et importez-le. Très important : lorsque vous avez réglé les problèmes de classes manquantes, il faut réimporter tous les assets à partir desquels l’erreur est apparue dans la console, toujours petit à petit (avec les mêmes sélections), qui sont déjà importés pour recréer les variables et les références qui ont pu se briser.
Pour vous aider dans le processus, je vous conseille d’avoir la fenêtre du Gestionnaire des tâches pour voir la taille que prend une sélection d’assets en import pour mieux découper les imports.
Une fois que tout est importé, faites un test. Il ne devrait rien manquer si vous avez tout bien importé / réimporté / réréimporté / …
Si vous avez des problèmes de NullPointerException ou des incohérences de comportement dans le test, identifiez l’asset qui lève cette exception ou l’incohérence puis réimportez-le. Ne faites surtout pas la réassignation vous-même, le réimport est censé corriger les problèmes de références manquantes (Missing) et les valeurs qui n’ont pas été bien importées.
Le plus long dans le processus a été, pour moi, d’attendre l’ouverture du unitypackage à chaque import. C’est pourquoi vous devez bien comprendre comment sont rangés vos assets pour bien découper vos imports. Je pense que le mieux est d’importer du plus générique au plus spécifique. Par exemple, importer les scripts des plugins sur lesquels s’appuie votre code, puis petit à petit, importer les prefabs et assets jusqu’à arriver à ceux utilisés dans les scènes. Les scènes doivent d’ailleurs être importés en dernier, il s’agit du bout de la chaîne.
Voilà, j’espère que ça servira à quelqu’un. De mon côté, ça m’a permis de travailler avec Mercurial.