To get the point where two lines intersect, we will do some maths. To the mathematicians who will come across this post, I’m truly sorry for the heart attacks or strokes you may experience by reading this post.
Ok, let’s take a look on the figure:
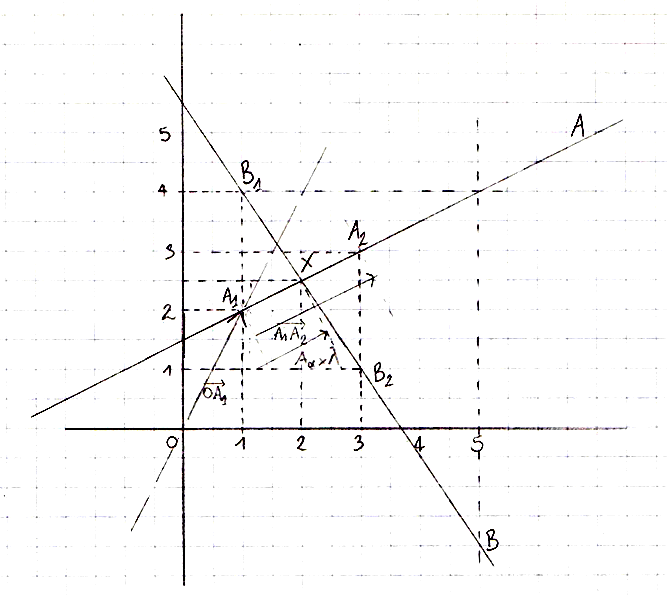
Figure 1
First, sorry, I was too lazy to make a proper figure using computer tools so I just put a scan. XD
Next, here are the definitions:
& : the two lines,
, : the arbitrary starting points of the two lines,
, : the arbitrary points which tells the direction of the two lines,
: the intersection point,
: the origin point.
Kewl. Now, what we want is the intersection point between those two lines. In other words, we want to know the position which starts from either lines’ arbitrary starting point, added by the direction of the line multiplied by a scalar value. So in our figure 1, the position is:
the position added by the components of multiplied by an unknown which I named
the position added by the components of multiplied by an unknown which I named
In this case, it is clear that so it will be easy to check if our final formula is correct. 🙂
At the point of intersection, we know that:
… which gives us:
But we can’t use this statement exactly like this to solve our equation as we cannot multiply and divide vectors in this raw format. Also we need to reduce the unkowns count to 1. So we will separate our equation into two equations with the magic of matrices (which I don’t understand well at the moment), one for the x component and one for the y:
To make our equation more readable, we will use some shorthands:
… so:
From this point, we can reduce the unknown count. In my case, I have chosen to keep instead of :
And finally, you have to check if . This will happen if your two lines are parallel or if there is one line defined as a point such as or ; no solution exists in those cases.
Use a single BoxCollider for all your planes. For example, if you have multiple aligned planes, remove their Collider component (Box, Mesh, whichever they have) and on only one of the planes, add a BoxCollider and adjust its center and size values in the component’s inspector to encapsulate all the planes.
Pros
Simple.
Cons
Supports only rectangular surfaces.
Method 2: generated colliders
If you are rolling your ball on a non rectangular surface, you will need to find a way to generate a mesh collider for all your planes. For this, choose one of the following:
the easy way: look for a plugin online or on the Asset Store,
Pros
Just works.
Cons
Uses noticeable CPU power when updating (baking) the colliding mesh in real time. Update sparingly.
Method 3: ramps as bridges
Create a set of meshes from a 3D software such as Blender to make invisible ramps which will be placed partly underground between your planes. They have to be large enough to make the transitions as smooth as possible. The height between the top of the bridge and the ground (the planes) should be approximately the value defined by the Default Contact Offset value in the Physics Manager.
Pros
No real improvement.
Cons
The ball may jump a little, especially at high speed.
Doesn’t work with small tiling (or when your successive planes are small): the longer the tiles, the longer bridges can be.
Requires a lot of testing.
Requires 3D software usage.
The result is not consistent.
Requires good workflow / toolchain.
Method 4: make custom extended planes’ colliders
This one should not work very well.
Create in a 3D software a planar mesh. Then, on its edges, extrude towards outside and lower down slightly the new edges. To put the words into image:
Make them intersect, and hopefully the bouncing will be invisible.
Pros
Quite simple.
Cons
The ball may jump a little, especially at high speed.
Requires a lot of testing.
Requires 3D software usage.
The result is not consistent.
Requires good workflow / toolchain.
Method 5: turn slightly your planes’ colliders
Make your planes’ colliders slightly rotated so that, in the direction of movement, the end of a collider is slightly above the next plane’s collider. The height should be approximately the value defined by the Default Contact Offset value in the Physics Manager and hopefully no bouncing will occur.
Pros
Works flawlessly.
Cons
You will see the ball flying and falling a few units from one plane to another.
Method 6: do everything by script
Maybe the Physics is not what is the best for your gameplay. Write your own system with accelerations, collision detection. This is the old-fashioned way and is the choice of a lot of developers! ^^
Pros
Works flawlessly.
Permits game design driven gameplay and not by physics.
Cons
Not using the PhysX forces and gravity.
Requires to work (omg! 😉 ) to simulate fake physics.
Method 7: Make your ball much larger
By using a greater ball (x10, x100), this could lead to less edge detection.
Pros
May work.
Cons
The scale of the simulation would change: if you make everything at the same scale as the ball, objects falling by gravity will look like they fall in slow motion.
The result is not consistent.
Method 8: collision layers and raycast
This one is pretty cool.
Keep single BoxColliders for each plane. Set the layer of the plane prefab to SinglePlanes (create the layer).
Make a big Unity cube with a collider which encapsulates all the planes. Set the layer of the cube to ContinuousPlane.
Create two layers: OnAPlane and NotOnAPlane.
Set the ball prefab’s layer to OnAPlane.
In Physics Manager, set the collision matrix so that:
NotOnAPlane and ContinuousPlane are not collidable (unchecked),
OnAPlane and SinglePlanes are not collidable (unchecked).
On each Update(), do a raycast from the center of the ball towards Vector3.down on the layer SinglePlanes:
If the raycast returns false, the center of the ball is not on a plane. So now, we change the layer of the ball to NotOnAPlane. The ball will start to fall through the hole.
If the raycast returns true, set the layer of the ball to OnAPlane.
For how to define a layer, please check the manual.
Pros
Works efficiently with dynamic floor layout.
You will learn how to deal with layers and Physics.
Cons
No real flaws.
Additional Information
Methods above may be combined.
You can adjust the physics project settings and / or set the physics materials to reduce the bounciness of your objects.
Make sure the thickness of the planes collision is not 0f. Make them 1f large or more.
There is a possibility to reduce the bounces, but I am not recommending it (may cause jittery and physics artifacts): set the Default Contact Offset to 0.0001. Again, I am not recommending it!
All of this post could be useless when the default PhysX embedded in Unity will be upgraded.
I originally posted this post as an answer on the Unity Answers website but none of the above methods have been considered as valid by the OP. Hence the removal from the answers website.
Try to avoid naming your MonoBehaviour methods Main(). These would be triggered between Awake() and Start(). This Main() method supports IEnumerator flavors as much as Awake() and alike! But as useful as it could be, I would not recommend to use it as there is no official documentation entry in the manual. And usually, you should not need this method.
Évitez de nommer Main() les méthodes se situant dans vos MonoBehaviour. Celles-ci seraient déclenchées entre Awake() et Start(). Cette méthode Main() supporte la version en IEnumerator autant que Awake() et les autres ! Mais aussi utile que pourrait être cette méthode, je ne la recommanderais pas à l’usage puisqu’il n’existe aucune documentation officielle dans le manuel. Et normalement, vous ne devriez pas avoir recours à cette méthode.
Awake() is fired, then Main() and finally Start(). But don’t use Main()!


